Visual BCD Editor - How To and User Manual
AUTOMATIC WINDOWS BOOT LOADER CREATION (XP,Vista,Windows 7/8)! (see Section 10)
FYI:
The boot sequence from MBR style hard disk in Windows 8/7/Vista is always:
BIOS => MBR (disk 0) => Partition Boot Record (of active Partition) => bootmgr (uses BCD) => selected boot-menu entry / loader
On GPT style disk boot sectors are NOT involved in booting! Firmware boot manager loads first boot candidate(Windows boot manager) directly.
TO BE ON THE SAFE SIDE - MAKE A BACKUP OF THE BCD STORE NOW !
Windows System Protection does NOT keep track of BCD!
1. Backup BCD (shortcut F4)
Select Menu - Store, Backup Store, then location where to store the file. Confirm.
2. Edit boot menu (shortcut Button "Edit Boot-Menu")
The boot menu is a list of OS loaders. This list is stored in the element 'Display Order' of the {bootmgr} object.
To edit the boot menu select the {bootmgr} object in the tree view then select 'Display Order' in the elements view.
Click edit button (or Dbl Click). A form pops up. Here you can edit the boot menu order, add and delete entries.
3. Rename boot menu entries (shortcut F2 on selected loader)
The displayed text for a boot menu entry is stored in the "Description" element of the corresponding loader.
Select loader, select "Description". Dbl Click. Edit.
4. Set default boot menu entry
Select loader you want to be the default loader. On the Object View click "Set as Default Loader" button.
5. Change boot menu timeout
Select {bootmgr}. Select 'Timeout' element. Edit. Windows default value is 30 (seconds).
6. Create new Windows 7/Vista Loader (shortcut F7)
RightClick -> Select New Windows 7/Vista/VHD loader
(or Click Menu - New, Select New Application, a form 'New Application' comes up with 'OS loader' selected by default, Click OK)
The newly created OS loader entry has elements with default values.
Change the 'Application device' and 'OS device' elements to point to the correct drive!
Change the displayed name of the loader by editing the 'Description' element.
7. Create new Windows XP Loader (shortcut F6)
RightClick -> New Windows XP Loader
(or Select Menu -> New, then New Application, then in the combo select NT loader. Click OK).
The newly created OS loader entry has elements with default values.
Change the 'Application device' element to point to the correct drive!
Change the displayed name of the loader by editing the 'Description' element.
Note:
For Windows XP to boot in a dual-boot scenario the files ntldr, ntdetect.com and boot.ini must be placed on active system partition. The ARC Paths in boot.ini must be adjusted ! (For example if Windows XP is on second disk (numbering starts from 0) on third partition the ARC path in boot.ini must be multi(0)disk(0)rdisk(1)partition(3) for default and OS entry.)
You can use ArcPaths utility to get the exact ARC path for your drives.
8. Create new BootSector Loader (Linux, Mac OS X) (shortcut F8)
RightClick -> New BootSector Loader
(or Select Menu - Object, then New Application, then in the combo select BootSector loader)
The newly created loader has default values for elements 'Application Device' first partition on disk 0 and 'Application Path' "\Boot\linux.bin" (path to "BootSector File")
Change the 'Application device' element to point to drive of "BootSector File" (for example: "c:").
Change the 'Application Path' element to point to path of "BootSector File" (for example: "\boot.img").
Change the displayed name of the loader by editing the 'Description' element.
For details on BootSector File and BootSector Loader please use guide for dual-booting Windows 7 and Linux/UNIX.
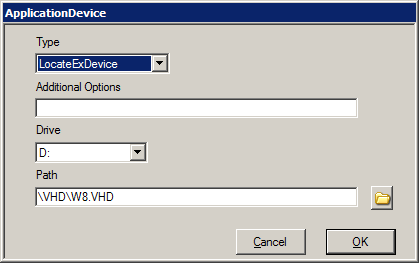
9. Create VHD loader ( see Section 6)
A VHD loader is a normal Windows 7 loader with ApplicationDevice and OSDevice elements of type "LocateExDevice".
For the device element specify: Type=LocateExDevice, Drive=D: and Path=\VHD\w7_32.vhd for example.
In Windows7boot blog you can find the screenshots and a few explanations on BCD entries created by standard Windows 7 installation to VHD.
If you attach the VHD for which you want to create a loader entry and then create the loader entry the "Application device" and "OS Device" elements must be of type partition. The mapping is done by Windows. Later if you detach the VHD you will see that the device elements are displayed as type LocateExDevice!
Device elements are true objects not just strings or numbers as are most other elements in BCD store. This is also the reason that there are only two possible ways of editing the BCD - with bcdedit or over the WMI BCD provider interface. As far as I know other GUI tools which can edit some parts of the BCD are achieving this by scripting bcdedit (stand mid 2011).
10. Automatic Windows Loader Entries creation (shortcut F9)
RightClick -> Create missing Windows loaders. Confirm.
The accessible Windows partitions as well as attached VHD's are scanned for Windows XP, Vista or Windows 7 installations and loader entries for every installation is created if not already present in the BCD.
This should be the preferred way of creating loader entries for Windows installations as
THE USER DOES NOT HAVE TO DO MORE THAN CLICK A BUTTON ;)
and all necessary parameters are created as needed.
11. Create a new element for an object:
1. Select object (in tree view).
2. In elements tab click on "New" button.
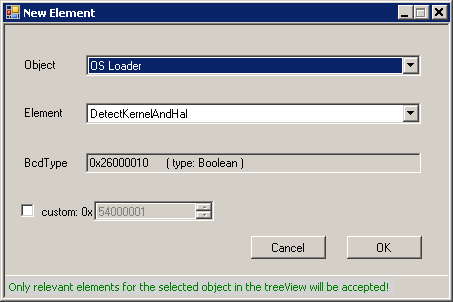
3. Select object type.
4. Select specific element.
5. Confirm.
It takes some time and effort to code apps and maintain a website, and liters of coffee ;)