How to move Windows 7,8,10,11 boot files to another drive/partition
and make it bootable
(procedure can be used also to make a bootable USB flash drive)
Preliminary Note:
On GPT style disks boot sectors are not used during Windows boot process instead two separate special partitions are needed:
EFI System Partition(ESP) which holds boot related files (partition size 100-500 MB, formatted as FAT/FAT32).
MS Reserved partition(MSR), special Microsoft partition which is exactly 128 MB in size, no formatting.(Beginning in Windows 10, the size of the MSR is 16 MB.)
Many UEFI boot problems can be solved by assuring that ESP and MS Reserved partitions are present on disk!
Suggested layout of GPT partitions for UEFI based PCs is:
ESP, MSR, Windows, Recovery
To make a bootable USB flash drive (MBR style layout) we need only one single FAT32 partition which holds boot files and OS files. Using FAT32 format allows booting flash drive on UEFI and on BIOS firmware!
Procedure outline:
Let's assume the destination drive/partition is mapped to drive H:.
It is recommended that the destination partition is formatted as NTFS (could be FAT32 on USB flash drive so USB is bootable on BIOS or UEFI firmware).
Note for MBR disks:
On a MBR disk only the active (and primary) partition can be made bootable! So we need at least one active primary partition on disk were boot files will reside. OS partitions can be either primary or logical. There is no problem if we have only one single primary (and active) partition on disk which should be large enough to hold boot related files and also all OS and program files. Separating boot files and OS files on different partitions is done for protection of critical boot files - in this case the boot partition is usually hidden so boot files cannot be altered easily.
We suggest using Dual-boot Repair tool (which can run on Windows XP to Windows 10) for this procedure.
1. Select Menu - Repair - Disk Management
In Disk Management mark drive/partition H: as active. (Right-Click drive H: and select "Mark Partition as active")
Windows always boots to active partition on MBR style disks!
2. Select Menu - Repair - Repair Boot Records
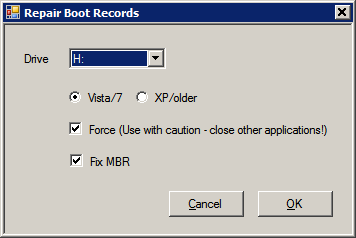
Select Drive H:, Vista/7, thick Force and Fix MBR check boxes and confirm.
This will write a Vista/7 MBR and PBR (Master and Partition Boot Record).
Note: On GPT disks we don't need step 1. and step 2. outlined above. Only step 3. outlined below is necessary to make a drive/partition bootable (assuming that EFI System and MS Reserved partitions are present on disk)
3. Select Menu - Repair - Repair BCD
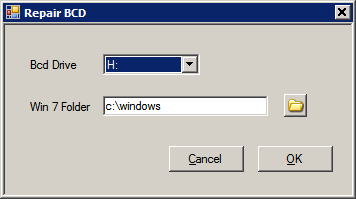
Select for BCD Drive - H:, and for Win 7 Folder - c:\Windows ( this is your Windows 7 folder - change c: if Windows 7 is on another drive! ) and confirm.
This will create bootmgr and \boot folder (with BCD inside) on drive H:.
In BCD (Boot Configuration Data store) a default loader for loading your Windows 7 system is created also by this operation.
That's all, enjoy your bootable H: drive!
Note 1:
This procedure can be used for Windows Vista, Windows 7 and Windows 8. Also a USB drive can be made bootable using this procedure.
In a multi boot system always select the latest Windows version folder in Repair BCD! (if you have Windows 7 and 8 - select Windows 8!)
Note 2:
To add boot loaders for other Windows operating systems (XP, Vista, 7, 8) use shortcut F9 in Visual BCD Editor - all is done automatically after user confirmation.
shortcut F9 = "New automatic XP, Vista, Windows 7 loaders" - this functionality is unique in Visual BCD Editor.
It takes some time and effort to code apps and maintain a website, and liters of coffee ;)